
Originally Posted by
Jonax

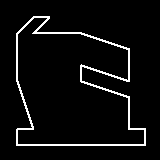
In fact I spent 100 lines of code just to make that image.
100 lines of code for that 
What are you doing to need 100 lines for that. I can draw that using 33 lines of code 
I hope you are not setting brush properties (color, thickness, brus style) and starting position for each line segment.
How I draw teh same image as you did
Code:
procedure TForm1.DrawNormal;begin
  //Fill background
  Image1.Canvas.Brush.Style := TBrushStyle.bsSolid;
  Image1.Canvas.Brush.Color := clBlack;
  Image1.Canvas.FillRect(Image1.Canvas.ClipRect);


  //Set pen properties
  Image1.Canvas.Pen.Style := TPenStyle.psSolid;
  Image1.Canvas.Pen.Color := clWhite;
  Image1.Canvas.Pen.Width := 2;


  //Move to starting position
  Image1.Canvas.MoveTo(16,144);


  //Draw lines to next points
  Image1.Canvas.LineTo(16,128);
  Image1.Canvas.LineTo(32,128);
  Image1.Canvas.LineTo(16,80);
  Image1.Canvas.LineTo(16,32);
  Image1.Canvas.LineTo(32,16);
  Image1.Canvas.LineTo(48,16);
  Image1.Canvas.LineTo(32,32);
  Image1.Canvas.LineTo(80,32);
  Image1.Canvas.LineTo(128,48);
  Image1.Canvas.LineTo(128,80);
  Image1.Canvas.LineTo(80,64);
  Image1.Canvas.LineTo(80,80);
  Image1.Canvas.LineTo(128,96);
  Image1.Canvas.LineTo(128,128);
  Image1.Canvas.LineTo(144,128);
  Image1.Canvas.LineTo(144,144);
  Image1.Canvas.LineTo(16,144);
end;
After looking more closely at positional values I noticed that all of them are multiple of 16 so I'm guessing 16 is your scalability factor for this image.So I then wrote a code that can draw your image using different scalability factors and thus allow scaling
Code:
procedure TForm1.DrawScaled(ScaleSize: Integer);
begin
  //Fill background
  Image2.Canvas.Brush.Style := TBrushStyle.bsSolid;
  Image2.Canvas.Brush.Color := clBlack;
  Image2.Canvas.FillRect(Image1.Canvas.ClipRect);


  //Set pen properties
  Image2.Canvas.Pen.Style := TPenStyle.psSolid;
  Image2.Canvas.Pen.Color := clWhite;
  Image2.Canvas.Pen.Width := 2;


  //Move to starting position
  Image2.Canvas.MoveTo(1*ScaleSize,9*ScaleSize);


  //Draw lines to next points
  Image2.Canvas.LineTo(1*ScaleSize,8*ScaleSize);
  Image2.Canvas.LineTo(2*ScaleSize,8*ScaleSize);
  Image2.Canvas.LineTo(1*ScaleSize,5*ScaleSize);
  Image2.Canvas.LineTo(1*ScaleSize,2*ScaleSize);
  Image2.Canvas.LineTo(2*ScaleSize,1*ScaleSize);
  Image2.Canvas.LineTo(3*ScaleSize,1*ScaleSize);
  Image2.Canvas.LineTo(2*ScaleSize,2*ScaleSize);
  Image2.Canvas.LineTo(5*ScaleSize,2*ScaleSize);
  Image2.Canvas.LineTo(8*ScaleSize,3*ScaleSize);
  Image2.Canvas.LineTo(8*ScaleSize,5*ScaleSize);
  Image2.Canvas.LineTo(5*ScaleSize,4*ScaleSize);
  Image2.Canvas.LineTo(5*ScaleSize,5*ScaleSize);
  Image2.Canvas.LineTo(8*ScaleSize,6*ScaleSize);
  Image2.Canvas.LineTo(8*ScaleSize,8*ScaleSize);
  Image2.Canvas.LineTo(9*ScaleSize,8*ScaleSize);
  Image2.Canvas.LineTo(9*ScaleSize,9*ScaleSize);
  Image2.Canvas.LineTo(1*ScaleSize,9*ScaleSize);
end;
PS: If you try to directly compile my code you may have to make slight changes where I set-up brush and pen style. Modern Delphi versions define many constants like Brush Style as sets instead of series of constants as it have been done in older versions of Delphi and is probably done in FPC. This then require slightly different code.


 Reply With Quote
 you may also want to check TCanvas.PolyBezier (
 . I'll probably skip the zipping. Indeed the PNG and JPG formats are great. I think in this case I had some problem making it work with PNG, while a BMP-file behaved well albeit being huge. Anyway. First priority is to create something executable and playable at all.
 . In fact I spent 100 lines of code just to make that image. A polyline with array could no doubt simplify things. And more curvy lines can add some allure.
Bookmarks